Documentation Index
Fetch the complete documentation index at: https://domoinc-arun-raj-connectors-domo-479695-remove-crime-report.mintlify.app/llms.txt
Use this file to discover all available pages before exploring further.
Intro
This article covers the fields and menus specific to the Wasabi connector user interface. To add DataSets, set update schedules, and edit DataSet information, see Adding a DataSet Using a Connector.Prerequisites
To connect to your Wasabi account and create a DataSet, you need the following:- Your Access Key
- Your Secret Key
- The name of the Amazon S3 Bucket you want to pull files from
- The Amazon S3 Bucket region
Generate an Access Key and Secret Key
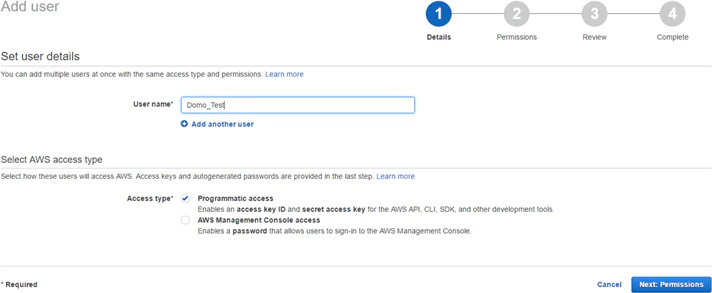
You must create a user with the proper permissions in the IAM Amazon Console before you can connect to S3 data in Domo. To configure your user in the IAM Amazon Console,-
Add a new user.
a. In the Details pane, under Select AWS access type, select Programmatic Access.
b. In the Permissions pane, select Attach existing policies directly, then select one of the following policies:
- AmazonS3FullAccess
- AmazonS3ReadOnlyAccess
Note: Customer-managed policies are not supported.c. In the Review pane, select Create User.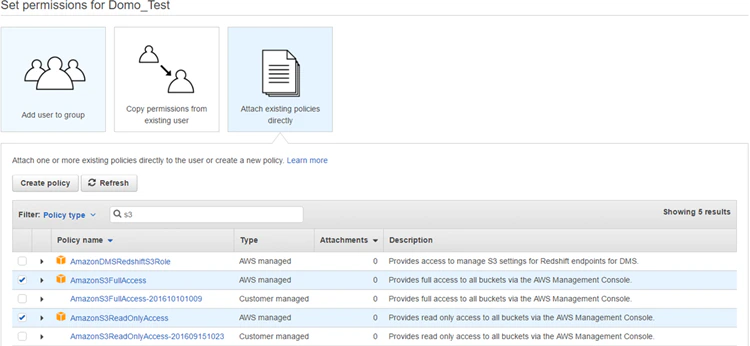
- After the user is created, copy the access key and secret key.
- Enter these keys in the Credentials pane in Domo.
Connect to Your Wasabi Account
This section covers the options in the Credentials and Details panes on the Wasabi connector page. The Scheduling and Name & Describe Your DataSet panes are universal across most connector types and are discussed in Adding a DataSet Using a Connector.Credentials Pane
This pane contains fields for entering credentials to connect to your Wasabi account.| Field | Description |
|---|---|
| Access Key | Enter your AWS access key. For more information, see “Prerequisites,” above. |
| Secret Key | Enter your AWS secret key. For more information, see “Prerequisites,” above. |
| Bucket | Enter the Amazon S3 Bucket you want to pull files from. |
| Region | Select the desired Amazon S3 Bucket region. |
Details Pane
| Menu | Description |
|---|---|
| What file type would you like to import? | Select the file type that you want to parse and import. |
| Prefix | Prefix limits the results to keys that start with the specified prefix. |
| File Name | Enter the name of the Amazon S3 Object (file) that you want to import. |
| File Name Match Type | Specify whether the retrieved file starts with or contains the name you entered in File Name. |
| File Compression Type | Select the compression type for your file. |
| Subfile Name | Enter the name or a portion of the name of the subfiles that you want to import. |
| Add FileName Column | Specify whether the “BATCH_FILE_NAME” column should be added to the final output. |
| Select the delimiting character | Select the delimiter used in your file. If the delimiter is not listed, select Other. |
| Specify your delimiter | Enter the character used to delimit the values in your CSV file. |
| Quote Character | Select the quote character to use when parsing CSV files. The default quote character is the double quotation mark. |
| Custom Quote Character | Enter the CSV quote character. |
| Escape Character | Select the escape character to use when parsing CSV files. |
| Custom Escape Character | Enter the CSV escape character. |
| Are headers present in CSV file? | Select Yes if the file contains headers; otherwise, select No. |
| Date Columns and Formats | Enter the date column names and their corresponding formats in the same order they appear in the file. Example: columnName1:dateFormat1,columnName2:dateFormat2Sample: columnName1:dd-MM-yyyy,columnName2:MM-dd-yyyy |
| Enable Parsing for Large JSON Files? | Select Yes to enable parsing large JSON files. |
| Does your JSON text require a line reader? | Select Yes if your JSON text contains multiple lines that should be read. |
| Should the backslash be escaped? | Select Yes if your JSON text contains backslash characters that need to be escaped. |
| Enter your data tag | Enter the tag for the data in your file. |
| Use Advanced SublistToFlatten options | Select Yes to use the advanced SublistToFlatten option. When enabled, primitive arrays are expanded into a single cell. |
| Enter your sublistToFlatten | Enter the comma-separated list of values that you want to flatten in your data. |
| Delimiter For Primitive Arrays | Select the delimiting character to separate the primitive array values in a cell. |
| Enter fields to exclude | Enter the comma-separated list of fields that you want to exclude from the import. |
| Enter your header tag | Enter the tag for the header in your JSON text. |
| Enter XPath expression | Enter your XPath expression. |
| Do you require attributes in data? | Select Yes if you require attribute values as part of the data. |
| Header Start Row | Enter the header start row number in the file. |
| Data Start Row | Enter the data start row number in the file. |
| Footer Rows to Skip | Enter the number of rows at the end of the file to skip. For example, to skip the last two rows, enter 2. |
| Sheet Name | Enter the name of the sheet you want to retrieve from the spreadsheet. Check the sheet name for accidental spaces. If you leave this field blank, the first sheet in the workbook is used. |
| Sheet Name Match Type | Select how to match the sheet name you entered above. |